Thursday, December 15, 2011

Our Christmas Decor {2011}

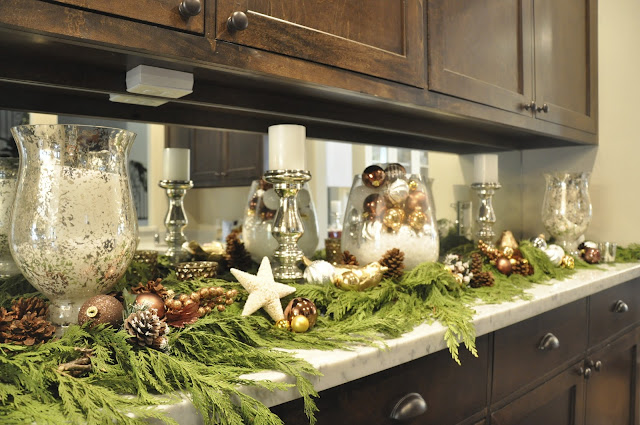
This year, our holiday decor is full of metallic colors and lots of greenery.  I left a lot of decor in the bins I organized last year, but may create a few more little vignettes here and there over the weekend.  My attention has been on gift buying this week (almost done!) and now cooking and baking, but I'm really enjoying the holiday decor in our home.


But I couldn't resist adding a few touches of red into the mix.  These branches and berries sit on our kitchen counter. 


A new throw pillow from Hobby Lobby.
And my favorite new addition- this adorable deer from Pier 1.  I'm gonna have a hard time putting him away- he's so cute. 


And this officially wraps up our Christmas Cheer Holiday Link Party!!  Visit Michaela Noelle Designs blog to link up YOUR holiday decor.  Thank you to everyone who linked up- I'm still looking at all the Christmas trees you linked to my blog:)


Wednesday, December 14, 2011

Guest Bath Update

Our guest/half bath downstairs has been sadly lacking any decor and despite the pretty marble countertop and copper sink, looked really blah.  I recently received my metallic gold "LOVE" print by Made By Girl and thought, "why not add it to this room?"  I had originally intended the print for my closet or office or our entryway- and it may move in the future- but for now, the bathroom it is!  :)


And since it's Christmastime, I added a mimi Christmas tree with gold-flecked branches (Hobby Lobby) and a vase full of ornaments.  


In the future, I'd really like to wallpaper this room in a bold, graphic print, but that's for another day!


*******


p.s. Our Christmas Cheer Holiday Blogosphere Party wraps up tomorrow with Michaela (Michaela Noelle Designs) featuring Christmas Home Decor.  Looking forward to getting a peek into your holiday home!


Tuesday, December 13, 2011

Holiday Link Party {Recipe- Peanut Butter Chocolate Chip Cookies}

I think this year the holidays have been all about the baking and eating!  I can't seem to stop with the sweet treats lately.  I love to indulge in all things chocolate and especially hot cocoa this time of year.  I've got a great recipe for Peanut Butter Chocolate Chip Cookies to share with you today.  


And be sure to link up YOUR recipe at Natasha's Blog (Schue Love) as we continue our Christmas Cheer Holiday Blogosphere Link Party.  Thank you so much to everyone who has linked up so far:) 


This recipe originates with cutie pie chef Curtis Stone from his Relaxed Cooking Cookbook.


Ingredients
1 cup unbleached all-purpose flour

1/2 teaspoon baking soda

1/2 teaspoon salt

1 cup natural chunky peanut butter (about 9 ounces / 280 grams) (I used creamy PB and peanuts)

1/2 cup (packed) light brown sugar

1/2 cup granulated / caster sugar

1/2 cup (1 stick / 125 grams) unsalted butter, at room temperature

1 ½ tablespoons honey

1 large egg

1 teaspoon vanilla extract

5 ounces / 155 grams semisweet chocolate, coarsely chopped 


Method

  1. Preheat the oven to 350°F / 180°C.

  2. Line 3 heavy large baking sheets with parchment paper.

  3. Mix the flour, baking soda, and salt in a medium bowl.

  4. Using an electric mixer, beat the peanut butter, brown sugar, granulated sugar, butter, honey, egg, and vanilla in a large bowl until well blended.

  5. Stir the dry ingredients into the peanut butter mixture in 2 additions.

  6. Stir in the chopped chocolate

  7. Scoop about 3 tablespoonfuls of dough for each cookie onto the prepared baking sheets, spacing them 2 1/2 inches apart.

  8. Bake for about 12 minutes, or until the cookies puff and begin to brown on top but are still very soft to the touch.

  9. Cool the cookies on the baking sheets for 5 minutes.

  10. Using a metal spatula, transfer the cookies to a rack and eat warm or cool completely.


Of course, I have to start with my trusty and oh-so-cute helper.


 Gather all the ingredients.


Combine the dry ingredients (flour, baking soda, and salt) and the chocolate chips and nuts.


Add the peanut butter.


Mix.


Add the chocolate chips and nuts.


Prepare into balls


Bake for 10-12 minutes.


Enjoy!


Head over to Natasha's to link up your recipe and to check out the other links!


In case you've missed any of the parties so far, here they are!


**********


http://www.schuelove.com/2011/12/christmas-cheer-link-party-christmas.htmlhttp://www.schuelove.com/2011/12/christmas-cheer-link-party-christmas.html


***********


Sunday, December 11, 2011

M.A. Hadley American Pottery Giveaway WINNER

Hi there!  I hope y'all are enjoying your weekend!  I wanted to announce the winner of the M.A. Hadley American Pottery Giveaway:)


The winner is


Congratulations!  Thank you to everyone who entered!

Thursday, December 8, 2011

Christmas Cheer Link Party {The Christmas Tree}

Hi everyone! Welcome to the Christmas Tree edition of our Christmas Cheer Holiday Link Party!


We are getting closer to Christmas!  Do you have your tree up and decorated yet?  In our house, the tree goes up the day after Thanksgiving and comes down around the start of the new year.  I so enjoy having the tree lit at night and really look forward to having it around each year.


Our tree is lit with white lights, filled with lots of gold, silver, and amber balls, as well as a few special sparkly ornaments. 


The owl ornament is a nod to my grandma, who loves owls.  Ours was found at Pier 1. 


Some of the lights are still (remember last year) out on our faux tree:)  Do you spy me and the tripod in the glass ornament?!


The "Our First Christmas" ornament is to the left.


And a little bit of bokah:) 


I can't wait to see YOUR Christmas trees!!  Link up below!  I will be featuring some of your trees next week:)


Wednesday, December 7, 2011

Merry Christmas from Our Family to Yours!

I finally ordered our family Christmas cards.  Yeah, it's a little late- should be here by the 14th, which means my friends and family might get them by Christmas if I get them addressed and in the mail in time:)


I couldn't decide if I was going to splurge on the Tiny Prints photo cards, do a less expensive Walgreens version, or buy regular cards and possibly put a photo inside?? Decisions, decisions.  Then I recalled the cute family photo we took earlier this year and I knew it had to be the one for our cards.  I went with the Tiny Prints card below.


I added the (1) after James' name after receiving some cards where the sender did that- I thought it was a good idea so you could reference how old the children are in the photo.  Looking back, it might be hard to remember.


My other favorites are below.  Isn't it cool how you can customize the card and preview it to see which one is your favorite?


I really liked the "Spread Holiday Cheer" but James' foot got cut off and I didn't want to have to keep resizing.


And below, his head and feet were cut off.  I'm sure I could've fixed it, but I really like the one we ended up choosing- so festive.  You really can't go wrong, can you?!


Are you doing cards this year?  I almost didn't!